Lego wedding table plan setup with four Lego vases with 17 Lego Roses & Thistles each. Taken at Wedding Venue

Lego Wedding: The Big Day

Lego Wedding

One year of building 4 vases, 68 roses, 16 thistles, 42 personalised minifigure guests, 1 table plan, 13 large letters and 8 boxes of Lego, the mega Lego Wedding build was complete!

I will keep this post short and to the point, as the images speak to themselves.  The Lego Rose & Thistle Vases were setup per table, with their personalised favours.  I also added some last minute Lego letters for the top table spelling out our new name – Mr & Mrs Johnson.  Wooden letter boxes full of Lego bricks were also provided for our guests…. even if it did mean I ended up with a variety of Lego cocks by the end of the evening!

Our Lego Wedding Cake finished everything off nicely, courtesy of Cake & Lace from Newbury.  The three layered cake had two personalised and edible Lego version of myself and my wife.  Each layer had sections peeled back revealing a Lego brick interior.  It was perfect and tasted great to!

Time to finally close this chapter and plan my next Lego build.

Photography Credit:  Adam Hillier Photography

Mark!

Lego Wedding Party Minifigures

Lego Wedding Minifigure Personalisation

Lego Wedding

A Lego themed wedding wouldn’t be complete without personalised mini-figure guests!

Every guest who attended the wedding got a personalised Lego version of themselves to take home.  Unfortunately I was unable to construct everyone as a Lego Star Wars character (courtesy of my childhood), so logged into BrickLink.com and ordered a set of heads, hair, torsos and legs.  Using everyone’s Facebook profile photos online, I built the whole wedding party (44 day guests) in a few days.

In addition to this each guest received 4 bags of Lego chocolate which we found on Amazon sold by Gwynedd Building Blocks.  We ordered a small taster kit initially and then a 2 kilogram box!  We would both highly recommend them to anyone else.  Yum!

Lego Wedding Table Plan

Once my army of Lego minifigure wedding guests was complete, I started to build the table plan.  At first I expected this to take a few hours, but this escalated quickly into a few evenings after work and a whole weekend!

I started by setting up a mini photo studio in my living room (you will notice by now I have a very forgiving wife!) and started to snap comical scenes with each wedding guest.  Every scene was personal to that individual person.  Highlights include:

  • Arresting the Groom:  Father-in-law was setup to arrests me whilst my wife and mother-in-law looked on laughing.
  • Catching the Bouquet:  Yet to be married women attempting to catch my wife’s bouquets.
  • Hide the Sausage!  Two of my friends from school were set up to play hide the sausage… granted in this case I was just having fun!

You get the idea.  You can see all of these at the end of this blog post.

Once I had finished with all these photos, I added them to my table plan using the photo editing software Gimp (emphasis on the words photo editing).  Even the tables and miniature flowers on the plan were Lego! I finished the design off by using a Lego font across the by naming everyone on the plan.  You can learn how to do this by following this useful post by Persialou.

You can see the table plan, the flowers and other extras in my final post next month where the whole Lego wedding comes together.

Mark

Lego Rose feature image

Perfecting the Lego Rose for the Wedding

Lego Wedding

An English Rose for a wedding between an English groom and a Scottish bride… this was always going to go down well with her side of the border!  Over a six month period on and off and whilst moving to Japan part way through, I built four different variations of my Lego Rose.  The end result was an elegant Lego rose which was also somewhat and “wedding guest proof”.

It all started with this simple design, using a similar approach to the Lego Tulip. A little too small for my table centerpiece though… let’s make it bigger! I simply built upon the initial version by adding extra petals to give a three layered petal design with an interior centre twist.  The second iterations increased size worked, but felt overly ‘blocky’ (yes I know I was building with Lego). The new stem looked great though.

Lego Rose v3

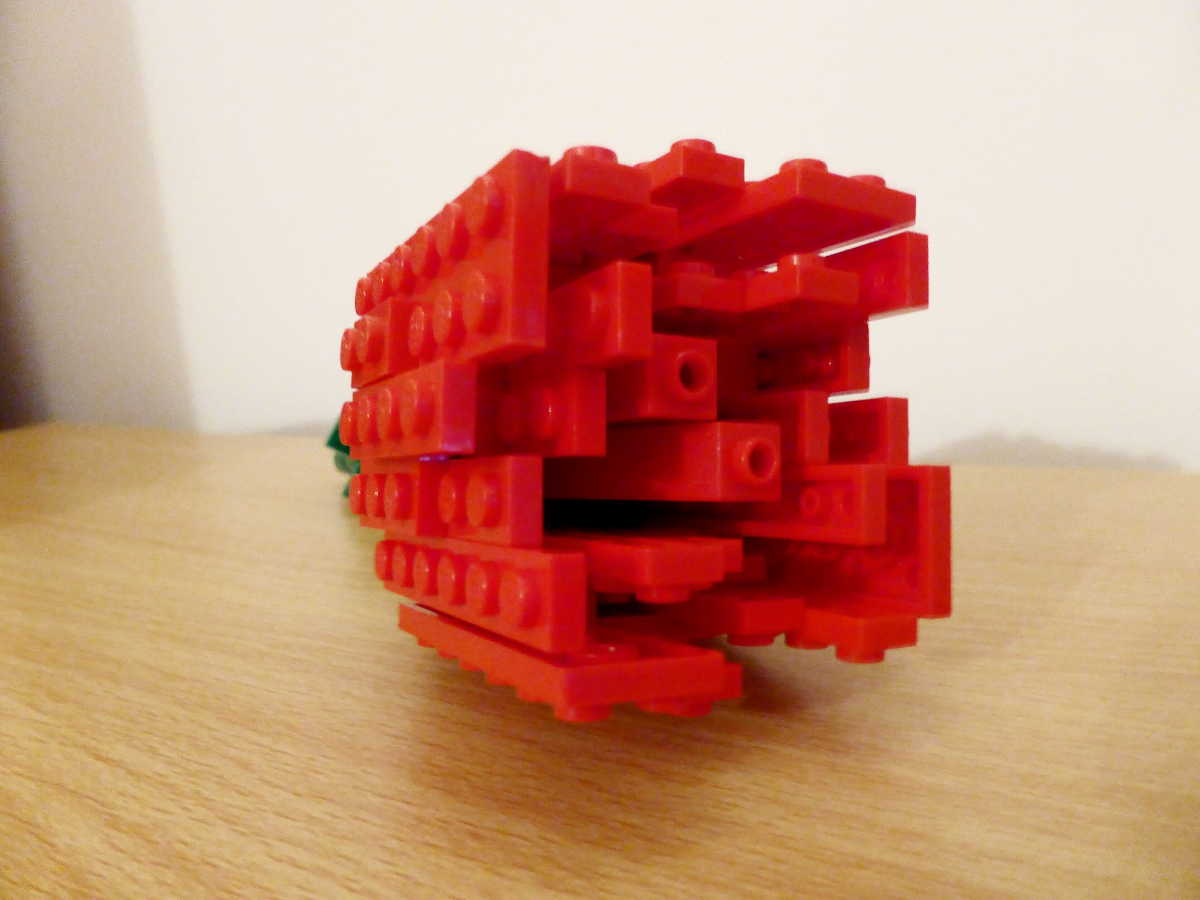
How to make Lego look less ‘blocky’? I think my third iteration answers this question, with a slimmed down version with rounded petals. I achieved this by layering up basic slate bricks and combing them with trapezium slate bricks to add extra curves. Adding some small sloped tile bricks increased the effect.  These four petal cores were attached to an improved central block with a twisting centre.  Using the small tiles in the centre, I also found these really elegant curved bricks which I overlapped to pull the design together.  This design was a significant improvement on its predecessor!

Final Lego Rose Design (v4)

Elegance is all well and good, yet when it can’t stand up by itself it is beyond useless for a wedding!  The final Lego Rose was a minor tweak on its predecessor, with the aim to add strength.

I found some old plastic tubes which I think were part of a Lego submarine I got in Torquay as a child and inserted one within the stem of the rose. This added the much needed rigidity to the stem. I managed to find a suitable set of similar plastic tubes from Joshin across the road from my apartment in Kobe, Japan.  To get the rose head to connect to the stem I had to tweak the inside of the rose base a little for the tube to sit inside.  A little elegance was lost in the base of the flower, but this was quickly resolved with a larger green cylinder.

Other updates to the design included minor tweaks to the petals for simplicity and strength. There were a few drop tests involved and was surprisingly sturdy!

Happy with the design it was time to replicate and build 68 of my Lego Roses and design 4 vases!  You can read about this in my next blog post. Let me know your thoughts and comments on my final Lego Rose design.

Mark

Lego flowers blog post

Experimental Lego Flower Design

Lego Wedding

After distracting my wife to be with a shiny engagement ring, it was time to order a ton of Lego and start the design phase of my year long Lego Wedding project!

Once I got over the new brick excitement, I knocked together a small simple Lego flower with 7 petals clipped onto a Lego technic steering wheel.  Simple yet dull.

I then got more creative and developed two new intricate and effective techniques. The yellow Tulip (open and closed versions) took 4 core petals which were attached to a central core with outward facing studs. I liked this lots. I then tried another technique by layering various slate bricks upon each other to build a larger red flower (not a clue if this resembles any real world flower). This technique allowed me to create petals of any shape. These quick mock ups would form the basis of the next two flowers I would design…

Lego Gerberas

Flicking through images of Gerberas flowers on Pintrest, I concluded it would be good candidate for my layered petal technique. My initial version used a two tiered petal design clipped onto a octagon shaped Lego brick. I then added another technic steering wheel to it’s centre to complete the flower (left pic). Whilst this worked well, it wasn’t round or full enough. I therefore tweaked the petal design and added extras to create the full Gerberas look (right pic). This design also leveraged a Lego pipe which was secured to a technique wheel and octagon. Only issue was it was a little heavy, yet still quite a realistic copy of a real life Gerberas.

Lego Rose

Designing a Lego Rose was always going to be a flower I would want to attempt for the Lego Wedding!  My Lego Rose was built using the same technique as the Tulip, with a central core of outward facing studs attaching 4 core petals. The picture below is the second version of my Lego Rose. I take this design further in my next blog post focused on perfecting Lego Rose design…

Lego Engagement Ring Box Open Close Up

Lego Engagement Ring Box

Lego Wedding

What better way to persuade my future wife to have a Lego themed wedding, than proposing to her with an engagement ring in a Lego box!

The ring box went through various iterations, utilising various red, black and white tiled bricks left over from my childhood Lego collection. The box sits at 6 x 6 studs wide and 3 bricks high to match the dimensions of a standard ring box.  The ring (not made of Lego!) sits on a mini raised plinth made from a 2 x 2 brick and a few 1 x 2 slates for a secure ish fit. Luckily her costume jewellery worked as a perfect substitute while designing this box whilst I spent a few weeks going in and out of shops looking for the perfect engagement ring.

The box and the ring was a success and she said “yes” when I proposed in Budapest on a four wheeled bicycle on November 2014. The Lego wedding theme snow balled from here…

Brick Twist Introduction Feature

Building a Lego Blog Brick by Brick

General

Welcome….

I am currently sat on a deck chair in Croatia celebrating my honeymoon after 18 months of planning my Lego themed wedding.  68 roses, 16 thistles, 4 vases, 13 large letters, 1 personalised table plan, invitations, 44 personalised mini figures and a customised ring box ALL made of Lego! Why? Lego has been my hobby and passion for the last 3 years, so what better way to make the most important day in your life unique and special!

Now that the big day has come and gone, what next? Well now that I plan to take a two to three month break from building Lego, I thought it was about time kick off a blog to document the Lego wedding build process. Once I recovered from Lego fatigue, will also start to add additional projects as they come.

Back to the wine, beer, cocktails and endless food for now.

Mark